Tutorial.
The 9 minute Video Tutorial below is in english and demonstrates how to quickly set up Wolfeye. You find a spanish Video Tutorial here: https://www.wolfeye.de/tutorial-es/
Summary of most important things (watch video)
- Set an exception in the antivirus program for the installation folder which is: C:\Users\Public\Documents.
- Download Wolfeye Remote Screen .EXE file. extract the ZIP file and run the EXE.
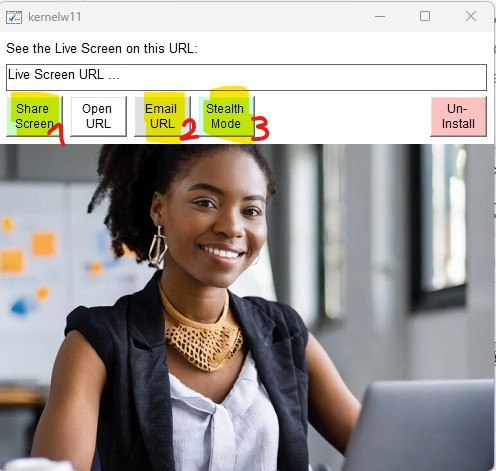
Press 3 buttons:
- The “Share Screen” button (that button will start the screen sharing)
- The “Email URL” button (that button will send to your Email inbox the live Screen URL link where you will see the computer live screen.
- The “Stealth Mode” button (that button will hide Wolfeye Software. It will run in stealth mode in the background without beeing noticed by the user and will run with windows startup)
Step 1: Set an exception in the antivirus program
The first step begins even before the download: You have to select the download or installation folder and add it to the exception list of the antivirus program – this is important.
Because Wolfeye Remote Screen is a surveillance software and therefore works like a “hacking tool”. For this reason, antivirus programs see the application as suspicious.
However, just putting the folder into which you will copy the application into the exception is sufficient, because the application only operates within this folder and does not copy anything into it or do anything else.
It is important that when choosing this folder – when choosing this path – we choose a folder on which every PC user has write rights. Because of course we want to use the application to be able to monitor any user on this PC.
And for this reason we should best choose a folder on C:\Users\Public\Documents, or C:\Users\Public\Documents\w create the folder named w:
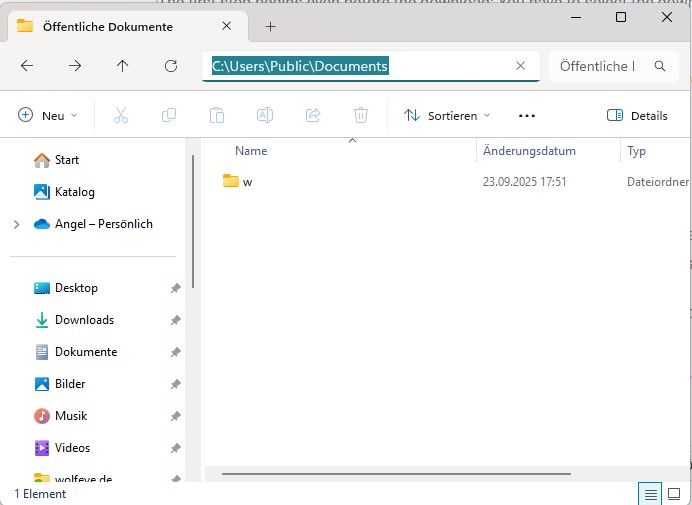
We will copy Windows Remote Screen into the winupdate folder. First we will put this folder in the antivirus exceptions.
How to do this depends on which antivirus program you are using. If you want to know how your antivirus program works, send us an email and tell us which antivirus program you use. We will give you the instructions for setting up an exception in your antivirus program. There are antivirus programs in which the exception must be set in different places. Because, for example, there is a live scan and a general scan. So please send us an email if you have any questions.
I now show here how to set such an exception in the Windows Defender Security Center of Windows. I do this by typing here in the Windows search box, then Antivirus, and clicking Virus and thread protection:
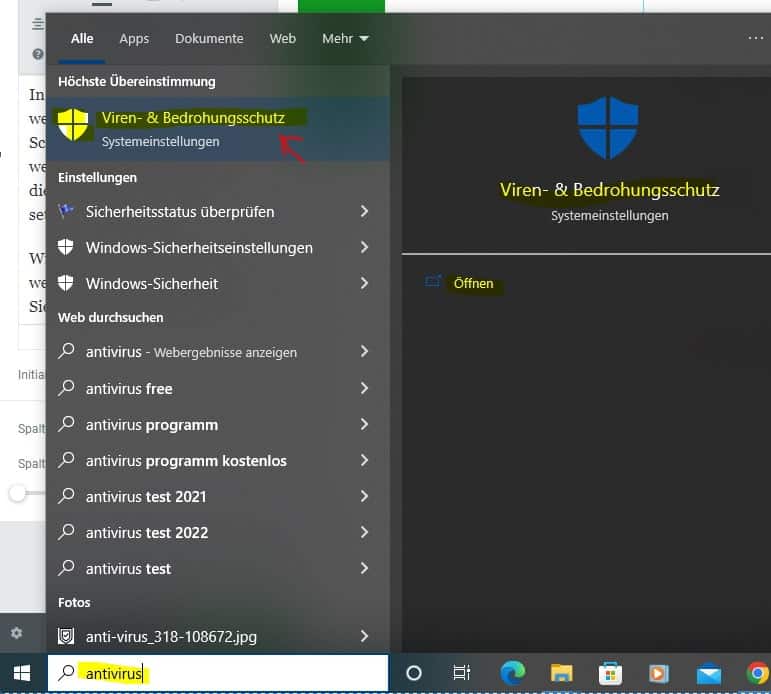
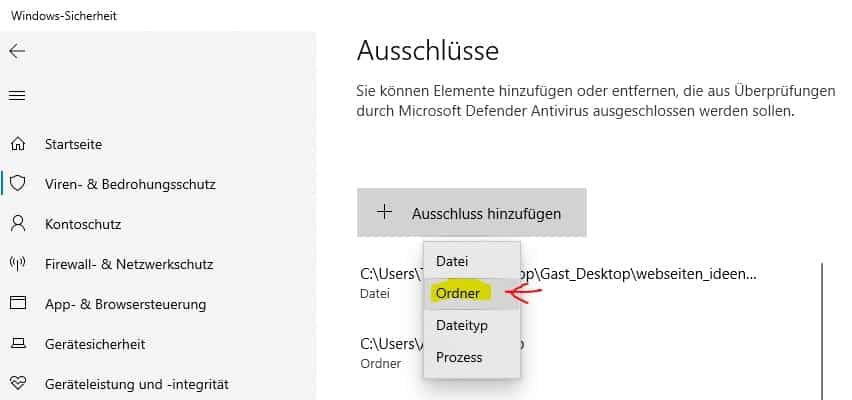
Virus and threat protection opens and next I go to Virus and threat protection settings (thread and protection settings). A page appears, I have to scroll down and click on exclusions. And here I can add or remove exclusions:
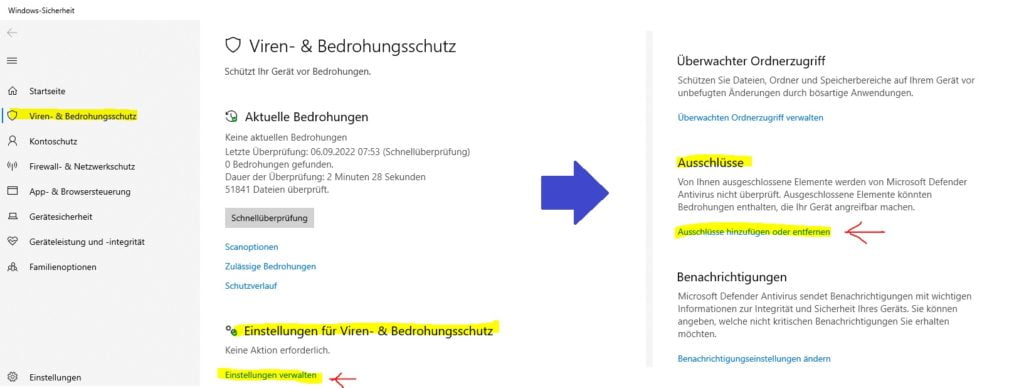
And I can choose to put a specific file or folder in the antivirus exception. But I choose a folder because I want to add the whole folder. I click on it now and enter the folder “winupdate”. With this, the antivirus program will continue to scan everything normally, but skip one folder during the scan:
Step 2: Download Wolfeye Remote Screen
After putting the winupdate folder in the antivirus exception, we can download Wolfeye Remote Screen.
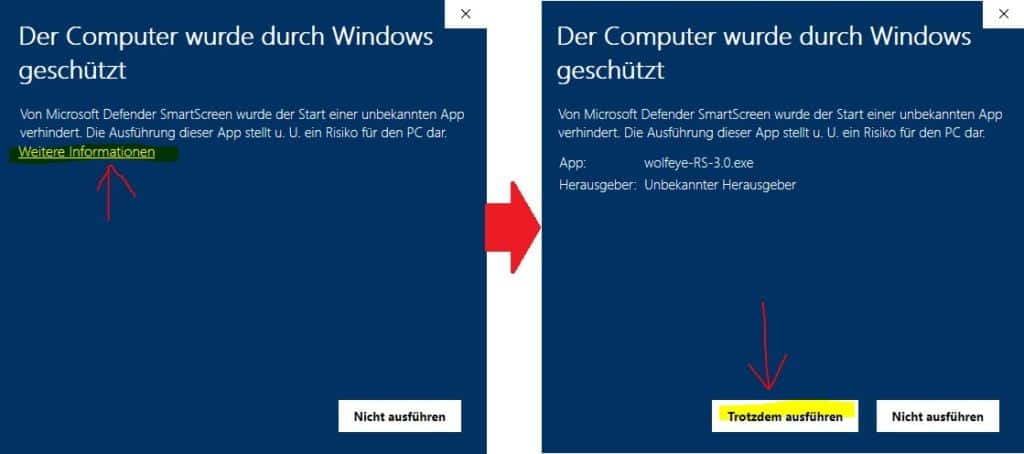
When you run it for the first time, a Windows message appears. Here you have to click on “more information” and “run anyway”. Of course, this message only appears the first time Wolfeye Remote Screen is run:
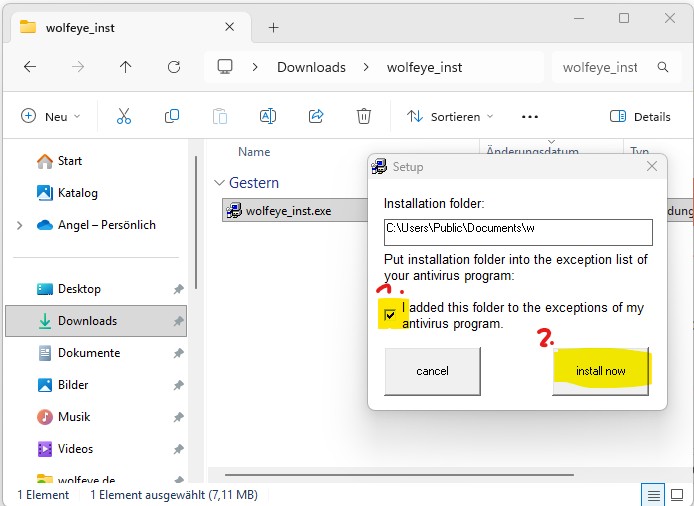
After download and extracting the ZIP file you can run the the application by double clicking on the .EXE file. Make sure you put the instalation folder into your antivirus exception list and confirm by checking “I added this folder to the exception of my antivirus program”. Hit “install now” to install Wolfeye:
It takes a few seconds until installation is finished, and then Wolfeye Remote Screen control windows opens:
Step 3: Set up / start Wolfeye Remote Screen
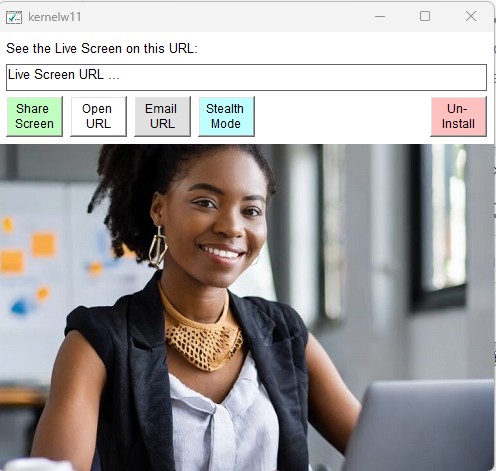
To run Wolfeye you must press 3 buttons:
- The “Share Screen” button (that button will start the screen sharing)
- The “Email URL” button (that button will send to your Email inbox the live Screen URL link where you will see the computer live screen.
- The “Stealth Mode” button (that button will hide Wolfeye Software. It will run in stealth mode in the background without beeing noticed by the user and will run with windows startup)
Monitor multiple users on the same computer:
Wolfeye will only run on the computer for those users for whom you started Wolfeye. So you have to start Wolfeye for each user you want to monitor. You can’t set it up for all users at the same time!
Last Check:
Please check if the Windows startup feature is approved (in most cases it is approved). To check this, go to Settings via the Windows Start menu, then to Apps and finally to Startup / Autostart. There, look for Wolfeye and turn on the lever if it isn’t. The illustration will take you there:
Stop recording:
Recording with Wolfeye Remote Screen will stop when you open the application (by double-clicking the .EXE file). Of course, the recording is also ended by pressing the “Stop Sharing” button. The software is uninstalled and completely removed from the PC via the “Uninstall Wolfeye” button.
Capture and save screenshots for follow-up monitoring:
If you want to take or save the screenshots in order to view the screen recordings at a later date, send an email to kontakt@wolfeye.de!
Password Protection of Remote Live Screen URL:
If you want to protect the Remote Live Screen URL with a password, send an email to kontakt@wolfeye.de!
This is of course highly recommended! This is switched off by default, but a short message via email is sufficient to activate the password protection.
You will then receive a link to set your personal password:
After you have set your personal password, you need a password to open the remote live screen via the link:
How to monitor all computers in your company
If you want to monitor all the computers in your company you will have to install “Wolfeye” on each of your employees’ computers. In that case you can choose to get a dashboard where you will see the live screens of each of your employees on a dashboard like this:
So as you see you will see the live screen of your employees all at the same time on one URL / link.
If you want to set up “Wolfeye” like that, please write us a message to “kontakt@wolfeye.de” or write us a Whatsapp ( +4915123278866). We will schedule a Google Meet Session where I will guide you so that you will be able to install “Wolfeye” by yourself. You can then install “Wolfeye” on each of your employees’ computers. Alternatively I can do the installation for you if you prefer using a tool like Anydesk or Teamviewer.
What happens after the trial period ends?
The software can be used free of charge within 3 days. After this test period has expired, the information about license registration is automatically switched on in the live screen URL.
After purchasing a license, however, you will automatically see the screen again as usual. So you don’t have to do anything on the PC, it’s all done on the server side.
In concrete terms, this means: everything is already set up on the computer and after the test period has expired, there is no message on the monitored PC. The message just appears on the URL you want to view the live screen from.