Start your free trial
Instantly see what’s happening on any computer — live, from anywhere. Just enter your email below to get your download link:
DOWNLOAD
Send download link to:
💡 Need help installing or testing Wolfeye? You can also book a personal demo where we show you how it works — live via Google Meet.
Book a Free Demo →
Instructions:
- Set an exception in the antivirus program for the installation folder which is: C:\Users\Public\Documents.
- Download Wolfeye Remote Screen .EXE file. extract the ZIP file and run the EXE.
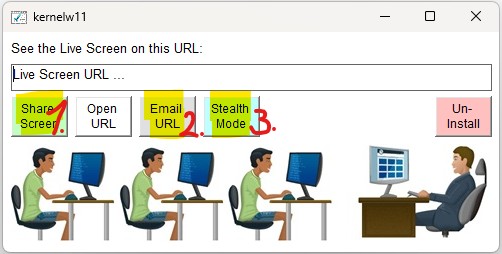
Press 3 buttons:
- The “Share Screen” button (that button will start the screen sharing)
- The “Email URL” button (that button will send to your Email inbox the live Screen URL link where you will see the computer live screen.
- The “Stealth Mode” button (that button will hide Wolfeye Software. It will run in stealth mode in the background without beeing noticed by the user and will run with windows startup)
Terms of Use:
The use of this software for illegal purposes or unlawful purposes is prohibited. The software may only be installed and run on your own devices. Use of the software and service on third-party devices without the consent of the owner and user is prohibited.